Monday 10 October 2011

Liquorice Liqueur: Absolutely the Best!!


I'll be very quick: I don't particularly like either liquorice or all the "after meal" liqueurs...but this one is so good that now and then I treat myself with a "bicchierino" of this delight! Besides, every single friend that had the chance to try it ended up bringing home a little bottle or bagged one for the "liquoriceaholic" friend...because everyone has at least one liquorice-addicted friend!! The recipe is my cousin Rachele's who is the official maker and dealer of this black pleasure.

RACHELE'S LIQUORICE LIQUEUR
1L Water
1Kg Sugar
150g Pure liquorice (in powder or pieces)
600ml Alcohol

Prepare a syrup dissolving the sugar with water on high heat and boil for 5'. Decrease the heat to medium-low, add the liquorice very slowly while keep stirring to avoid lumps (but if it happens, don't worry!) and boil for another 5'. Remove from the heat and let cool completely. Add the alcohol and bottle.

This liqueur doesn't need to mature so it can be used straight away (which is a plus!!) and it is best when served ice-cold (keep it in the freezer).

A black delicious smile and have a good week, 
Diletta

Tuesday 27 September 2011

Wild Cherry & Amaretti Tart: a Recipe Is a Treasure


This tart recipe remained stuck on my recipe book for years, unused; I don't remember from what magazine I cut it out neither who the author is...the only thing I know is that this cake became one of my favourite since the day I first baked it! This tart (crostata, in italian!) is a delight for the palate and a pleasure for the eye because it is not only very delicious but also really pretty (isn't it?). And it needs to be said that it is also kind of magic because the decoration is created in the oven while the tart is being baked. I stuck a recipe and I found a small treasure.. 

WILD CHERRY & AMARETTI TART
For 8 servings or for a 26cm tart tin

For the sweet shortcrust pastry
300g Plain Flout (or the italian "00" type)
150g Unsalted butter (at room temperature)
120g Caster sugar
1 Egg (medium)
1 Yolk
1 Lemon (zest grated)
7-8g Baking powder

For the filling
150g Wild cherry jam
Amaretti biscuits

In a bowl mix flour and butter together until the mixture resembles fine breadcrums; add the sugar and lemon zest and mix together. Add the egg and the yolk and knead by hand for a couple of minutes until everything comes together and you have big crumbs. Compact the mixture into a ball and let rest for 30' or more in the fridge, Meanwhile preheat the oven to 180°C. Roll 2/3 of the pastry until 3-4 mm thick and line the tart tin with it. Spread the jam on the bottom, soak very quickly the amaretti in the maraschino liqueur and arrange them in a spiral starting from the centre. Roll the last third of the pastry, cover the amaretti layer with it and seal the edges very well. Bake for 40'.

As you can see the ingredients are very simple so the same old rule applies: they have to be high quality!!

A delicious smile, 
D.

Wednesday 6 July 2011

Brustzicki: Feta & Mint Loaf

Brustzicki
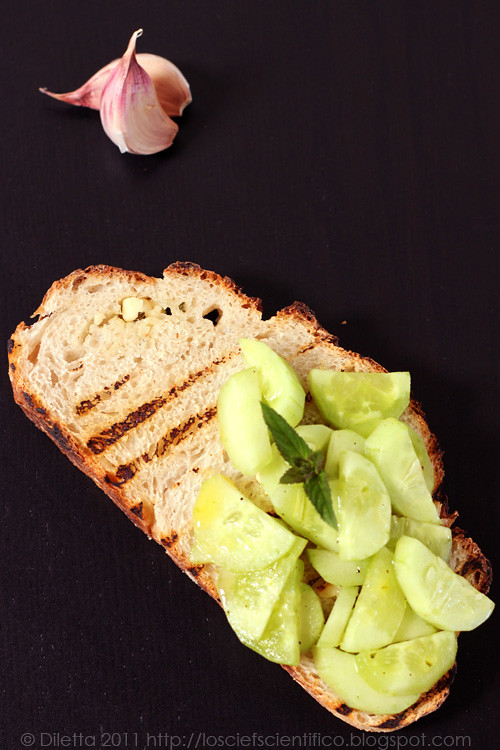
I love the summer heat and I am not afraid to use the oven even when the sun is high and hot (I am a brave girl I know!)...and, possibly, I use it more in summer than in winter! When the good weather comes I feel more energetic and a lot more imaginative...and not being able to throw away what is left after having fed my sourdough yeast, I always end up  kneading something! So here's an idea for a loaf with a real summery flavour! We ate it all sliced and grilled....and if you spread the bruschetta with plentiful garlic and garnish it with cucumber salad and a dollop of greek yogurt you have a perfect brustzicki (bruschetta + tzatzicki)!
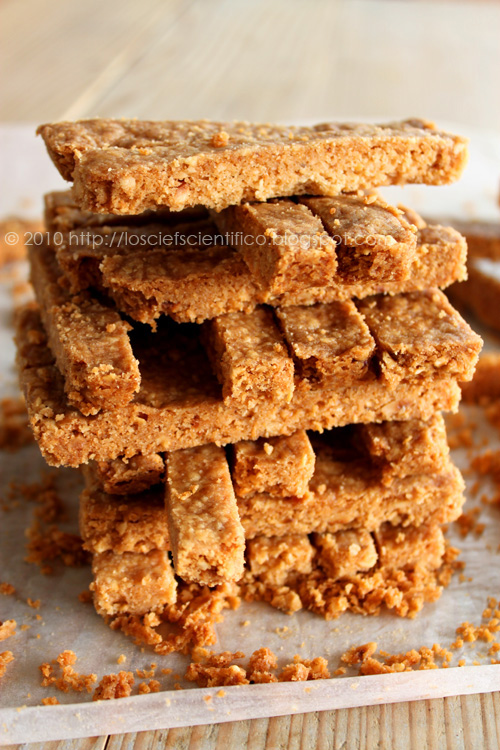
FETA & MINT LOAF
Makes 1,5 kg of dough or 3 loaves

For the pre-ferment
150g Sourdough yeast
150g Organic plain flour
150g Water

Put all the ingredients in a bowl, mix well and let the ferment rest at room temperature for 8-12 hours covering the bowl with cling film.

For final dough
450g Pre-ferment
800g Organic plain flour
400ml Water
20g Sale
100-150g Feta cheese
8-10 Mint leaves

To mix the dough by hand, put the pre-ferment with the flour and water. Miw together with a large spoon until it comes together to form a dough. Turn out onto a clean work surface and knead into a ball with your hands for about 10'. Cover with cling film and set aside to rest for 20-30'. Sprinkle the salt over the dough and knead it for further 20-30' until smooth and elastic.
If you are using a stand mixer, put the starter in the bowl with the hook attachment. Add the flour and the water and mix at low speed for 3-4', the increase the speed to medium-fast for 3'. Cover the bowl and set aside to rest for 20-30'. Sprinkle the salt over the dough and mix on slow speed for 1' then increase to medium-fast for 6-10' until the dough is smooth and elastic. 
Lightly grease a big bowl and sit the dough inside.  Cover with plastic wrap and set aside at roomo temperature to bulk prove. Knock back the dough by turning it out onto a lightly floured surface and pressing it out into a rectangle about 2.5 cm thick. Use you hands to fold 1/3 back onto itself, the repeat with the remaining third. Turn the dough 90 degrees and repeat the folding. Place the dough back into the bowl and continue to bulk prove for another 1 hour. Use a blunt knife or a dough scraper to divide the dough into three equal portions, weighing about 500g each. Shape each portion into a ballo or a loaf. Line three small baskets with a tea towel in each, lightly dust each with flour and place the loaf inside, seam side up. Alternatively you can place the loaves on a baking tray lined with baking paper, seam side down. Place in the fridge loosely covered with a plastic bag for 8-12 hours. Pre-heat the oven to its highest temperature. Remove the loaves from the fridge and let them rest for 1-4 hours depending on the climate. The prove is complete when the loaves have grown in size by two-thirds. Spray the oven with water. Bake for 20', then turn the tray around and bake for a further 15-20'. If the base of the loaves sound hollow tapping it with your finger, the bread is ready.


A smile soft inside and crusty outside, 
D.

Friday 27 May 2011

Serendipity

Lavander & A Bombo Bee

I am back.....again! I know it has been quite a long time but in the past year my life has been a roller coaster....
This time I'll stay, I promise!

A spirited smile and enjoy the Bank Holiday week end!!
D.

Thursday 20 May 2010

Shortbread or Jenga?

Shortbread or Jenga?

Do you remember Jenga? :)

The recipe is by Trish Deseine from her very good book "Cooking with friends"; I slightly modified it just by adding some roasted hazelnuts. To be honest I am not a huge fan of shortbread but I found this one very delicious...crunchy but it melts in your mouth...a real treat!!!

HAZELNUT SHORTBREAD

250g Salted butter
300g Plain flour
90g Sugar
200g Whole roasted hazelnuts

In a food processor chop the hazelnuts with the sugar until they are fine but with a little texture and put them in a big bowl. Again using the food processor, mix flour and butter together at maximum speed until the mixture resembles breadcrums and pour over the chopped hazelnutz. Knead by hand for a couple of minutes until everything comes together and you have big crumbs. Spread compacting it with your hands in a Swiss roll or round tin, lined with baking parchment, until 1 cm thick. Let rest for 30' or more in the fridge and meanwhile preheat the oven to 150°C. Bake for 50' until deep golden brown. Leave it to cool for 5 minutes and then cut into wedges (if round tin was used) or fingers (if a Swiss roll tin was used) and allow to cool completely before serving.

A crunchy smile,
D.

Sunday 16 May 2010

Little Pistachio Tiramisù with Strawberries

Tiramisù al Pistacchio con Fragole


The idea of making and serving Tiramisù in little pots is not mine...I "stole" it from Wiggi who, in turn, "stole" it from Sadler. Anyway, I can modestly say that I was lucky enough to be able to taste the original at her wonderful wedding and, because I am a spoilt girl, I took home with me 2, and I say 2!!!, of these little gorgeous treats...not without effort though, since the waiters at the party tried few times to take my preeciousssssss treasure away, not knowing about their boss' consent.

Trying not to copy everything from Wiggi's post, I thought to combine with the strawberries two flavours that with them are just perfect, chocolate, for the sponge, and pistachio, for the mascarpone cream...without doubts, a marriage made in heaven!!

PISTACHIO TIRAMISU' with STRAWBERRIES
Makes 8 little jars

For the SPONGE
(Recipe by Ilona Chovancova from her book "Rotoli" (Rolls))

5 Eggs
120g Sugar
120 g Plain flour
2 Tbsp Cocoa powder
1 Pinch of salt

Pre-heat the oven to 180°C. Separate the eggs and beat yolks and sugar together until pale. Sift the flour with the cocoa powder and the pinch of salt and add them to the beaten yolks a tablespoon at a time mixing very gently. Wisk the egg withes to soft peaks and fold them delicately in the mixture. Pour the sponge batter into a swiss roll tin (25 x 35/40 cm) lined with baking parchment. Bake for 12-15'. Allow to cool completely on a wire rack.

For the PISTACHIO MASCARPONE CREAM

5 Eggs
500g Mascarpone cheese
200g Sugar
100-150g Pistachio paste

Separate the eggs and in a large bowl beat the yolks with the sugar until pale. In another bowl mix the mascarpone and the pistachio paste together until soft and smooth and then add it to the beaten yolks mixing gently. Wisk the egg whites until they hold stiff peaks and fold them into the mascarpone/yolks mixture. The cream has to be light and soft so it is important not to beat off the air from it while mixing.

For the ASSEMBLY

Sponge
Pistachio mascarpone cream
Strong espresso coffee
Strawberries (20-30)
Cocoa powder to dust

Cut the sponge with a round cutter of the same diameter of the jar (alternatively, cut the sponge into strips as if they were savoiarbi biscuits) and slice 20 strawberries (roughly two for each little jar). Start to cover the bottom of the jar (or the glass) with the sponge soaked in the coffee for few seconds, then add 1-2 tbsp of mascarpone cream and some strawberries. Carry on with with a second layer of sponge and mascarpone cream only. Dust with cocoa powder and decorate with half strawberry.

And this is Sadler's original version:

Tiramisù...

A smile with the lid,
D.

Friday 14 May 2010

Alassio Kisses aka Baci di Alassio

Baci di Alassio

I fell immediately in love with these kisses when I saw them in the March issue of Sale&Pepe (italian food magazine)....and like Baci di Dama (Lady kisses), they seem very easy-peasy to make but beware, their simple recipe could be tricky especially the first time...In fact, I managed to bake perfect kisses only at the third attempt!!! Luckily I am very stubborn and I don't throw in the towel easily because these little beauties are SUPER DIVINE...especially if they are "forgotten" in the tin for a couple of days!

As I told you the recipe itself is very easy and, with a few tricks, fool's proof so....give it a go!!

BACI di ALASSIO
Per 20 kisses

250g Whole hazelnuts, toasted
200g Caster sugar
25g Honey (preferably runny)
25g Cocoa powder
2 Egg whites (60-70g) (*)

Preheat the oven to 180°C. In a mixer chop finely the hazelnuts with the sugar and put them in a big bowl. Sieve the cocoa powder on top and stir wells with a spoon. Add the honey and stir again. Whip the egg whites to stiff peaks and add a spoon at a time to the rest of the ingredients. This is the tricky step because the mixture has to be thik and firm for the kisses to hold their shape during baking (**). Therefore it is possible that it is not necessary to add all the egg whites. Line a baking sheet with baking parchment and fill with the mixture a piping bag with a large star nozzle. Pipe the kisses in individual swirls the size of half a walnut. Bake for 10-12' in the middle shelf and when ready (they shoul have a crisp skin), take out the oven and allaw to cool on a wire rack. Sandwich together with a teaspoon of dark chocolate ganache. Keep in a tin for up to 15 days (even more). Their taste develop if left for at least a day in the tin.

GANACHE

75g Dark chocolate (50-70% cocoa), chopped
75g Double cream

Bring the cream to the boil and set aside. Add the chocolete and stir until it is melted and the mixture is smooth and shiny. Leave to cool for 2 hours (or until the ganache is firm and can be spooned).

(*) The original recipe does not specify the weight of the whites so I considered the weight of the white of a medium egg (about 35g).

(**) The mixture has the right consistency when it takes a little effort to pipe it on the bakig tray; If you think that the mixture is a bit too loose, try to leave the kisses (once formed) on the baking sheet overnight at room; in this way they should hold their shape while in the oven.

A smily kiss,
D.